
Lots of first Christmas LOs, a digi and a hybrid design too!!!!!
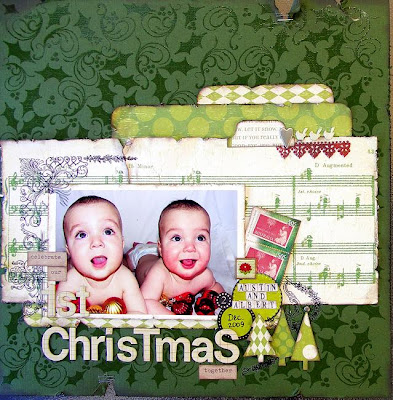
This year I decided to get in early to try and avoid the inevitable disappointment of not getting a decent "1st Christmas" photo of the new babies... THAT was my first mistake! After a flat battery, about 337 terrible photos, chewed and dribbled on props, a lopsided, scratchy Santa hat, a destroyed backdrop, two dropped lips and a screaming match (that was me) I gave up!
Thankfully there WERE 4 or 5 half decent ones among them and so armed with the gorgeous Making Memories Mistletoe range of papers, die cuts, stickers and brads I had an absolute ball creating my little guys' first Christmas pages. I wanted them to have similar but not exactly the same pages in their albums... so here is what I came up with. I hope you like them too.
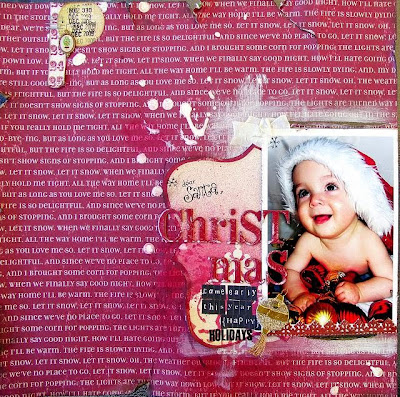
I used lots of distressing, sanding, scrunching and inking to create a vintage-ish look on these pages. VersaColor Pinecone Ink is my MUST have item for "antique-ing" (is that a word?) papers and embellies. I like lots of layering and clustered embellishments on my LOs and I have been brave and used my own hand writing both for journaling and one of the titles.
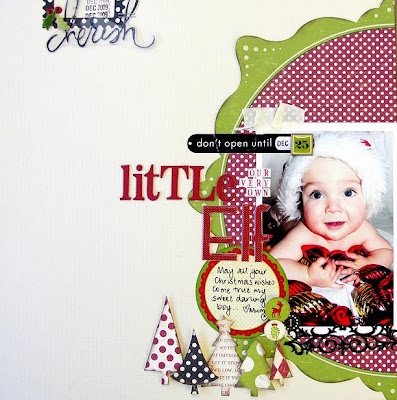
My latest favourite little addition to my pages is a little tag / embellie combo in one of the top corners of my LO. I think I stole this little idea from Louise some time back... though it could have been a mish-mash of a few other designs I saw and liked and adapted as my own.
I have also used some Urban Lily rubons and a bit of Heidi Swapp stuff. I also got out the Cuttlebug and cut some acetate heart shapes from old scrap supply packaging. I then added a bit of Dimensional Magic here and there and some German Scrap Borders. I managed to find a few little Christmas type embellies (the postage stamps, the gold tree and decoration) amongst my stash of ephemera. Finally some Tattered Angels Red Velvet Glimmer Mist and paint and Bob's WAS my Uncle (my great uncle in fact but he passed away a few years ago now).
I used the new Embossed Bazzill as the background for this one and I especially love the Glitter Music Note paper.
Now, I am no expert in the field of digital scrap booking but I have had a few tries and I think I am hooked. Just call me a "wannabe" for now! My first foray into this medium began with a visit to pickleberrypop where I found some freebies and a start up pack with some EXCELLENT and very easy to understand instructions for beginners... I cannot recommend it highly enough.
Eidou is another great place to start with some gorgeous freebies to download and some very reasonably priced kits to get you started.
This is a very basic digital LO created using Adobe Photoshop Elements 7. Don't be too daunted... really if you just follow through it step-by-step it isn't all that difficult... trust me, a computer geek I am NOT! If you have any questions please ask in the forum and I will try my best to help.
The red background paper is Strawberry from a kit called "JUICY" from pixel dust designs by Gina Fensterer which I purchased at Eidou. The journaling tag at the top right is a scalloped spot from digiscraps by Deb (Debbie Fisher who can be contacted at debfscraps@yahoo.com.au). The strips of paper above and below the journaling is Paper 2 by Tara Dunstan Designs; the white snowflake-like stamp is Stamp 2 by Kate Fairlie (who can be contacted at katespaces@yahoo.com.au) and the title is word art by Victoria Greenlees at Chirpi Creative (who can be contacted at info@chirpi.co.uk). They are all from a collaborative kit called imagine create share which I purchased from pickleberrypop. I am not sure that it is still available but they have dozens of beautiful kits at very reasonable prices also.
To begin this LO I opened Adobe Photoshop Elements 7 and clicked on Edit. In the top left corner I clicked File > New > Blank File. From here in the pop up box that appears I named the file IMPERFECTLY perfect. I made the Width 8.5 inches and the Height 11 inches and made the Resolution 600 pixels/inch, the Color Mode RGB Color, the Background Contents Transparent. This creates your work surface.
Next I clicked File > Open > then on your computer find the paper and elements you want to use (I have a folder named Digital Scrapbooking Supplies with all my digi stuff in it) and double click on it. You can open several from one folder if you hold down the Ctrl key and click on each and then click open. Open the photo(s) you want to use in the same way. All your photos, papers and elements can now be seen in the bin under your work surface... much as if you had gone to your stash, pulled out your supplies and placed them on your desk ready to use.
Make sure you have chosen Full Edit (top right hand side) so that you can see all the tools on your left. Choose the Move tool (top left of the tool box) that looks like a little arrow icon with an arrow pointed cross next to it. Be sure there is a blue square around your transparent (grey and white checks) background and that it is showing in the main window. Next I simply clicked on the Strawberry paper and dragged it up onto my background, then I just pulled it to fit the space and clicked the green tick that appears to confirm.
Next step was to arrange all my photos to fit the space. Basically the same principle, just clicking and dragging and sizing them to fit. This step might take a bit of time if you use multiple photos as I have done... otherwise if you want to start simple just use a single photo. If you want to improve each of the photos individually do this before you place them on the background. Have a play around with different effects using the Enhance button at the top and see what you like. You can save these or not it is up to you. I usually save as a new file and keep the original as is.
With the paper strips I used above and below the journaling I basically cropped the original image (with the Crop Tool... if you hold you cursor over each of the tool buttons it will tell you what each of the are) then dragged them to where I wanted them on the main page, just as you would with real paper. Just remember DO NOT SAVE CHANGES when you close the original image so you can use it again.
For the journaling I used the Horizontal Type Tool (the icon looks like a T). Simply open a box by clicking and draging the cursor where you want your journaling. Next choose the font, size, colour etc from the tool box that has now appeared at the top of the main window. Then type your journaling.
With the word art I erased (using the eraser tool) the original words but left the curly bracket. I then opened a text box as above and altered the element to say "IMPERFECTLY perfect". Again, I dragged this element onto my background then when I closed it I clicked DO NOT SAVE CHANGES.
Next I dragged the journaling spot to where I wanted it, opened a text box and typed my words and date. This is a bit fiddly to get in just the right position so the words lined up with the lines on the element.
Next step was simply selecting and dragging the stamp where I wanted it and resizing (again dragging with the Move Tool) to fit the space.
One thing to remember as you are choosing and moving elements is to be aware of which tool you have selected. To select the element you want to work on simply click on it with the Move Tool. It will be shown with a blue dotted box. You can also select the layer from the right hand side in the Layers Pallet.
The last thing I did was to add a Drop Shadow to each element by selecting it then in the Effects Box (on the right hand side above the Layers Pallet) I clicked on Layer Styles (the second icon) then clicked Drop Shadows in the drop box. I chose Low (again hold your cursor over each button / icon to see what the are called) and clicked the Apply box (bottom right hand corner of same box). This gives each element a bit of depth and dimension making it look more "real".
Last thing is to save your creation. First of all I clicked Layer > Merge Visible then I go back and click Layer > Flatten Image. Then I clicked File > Save As > I created a folder in my documents folder called Digi LOs... then just enter your chosen name. I prefer to save mine as a JPEG image in the Format box... but you can find more informatin about this side of the process in the Free Start Up Pack I mentioned available at pickleberrypop. As I told you I am no expert and the technical side of digi scrapping is way beyond me! ;) From here I clicked Save and another pop up box appears... I changed the Quality to 12 and clicked OK. Done!
I think the best bit of advice I can give you regarding digital scrapping is to just have a play around with it... click on buttons and just see what they do. You won't break it... well I haven't so far anyway! ;)
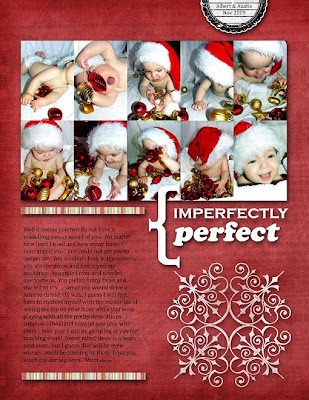
I also used that design to create this hybrid LO below by printing the photos, top tag and journaling onto an A4 size sheet of matte photo paper. I then added the Heidi Swapp ghost shape bracket (painted black on the back), Making Memories Mistletoe paper strips and sticker, the acetate heart, Collections icon, some staples and some alpha stickers for the title.
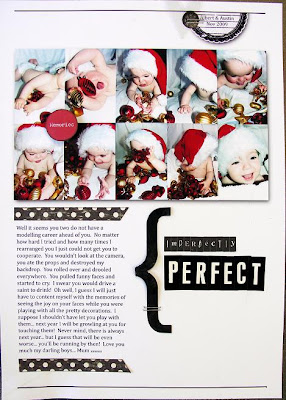
I DO like it... but I like the full digi version better! ;)
I hope you are well and truly in the festive spirit and that I have managed to inspire you to get some pre-Christmas scrapping started!
Lots of love and Christmas cheer to you and yours... AMC xxxooo
7 comments:
Wow, Wow, Wow - these are amazing! Off to scrapjack them now!!!
I'm so going to Jack these as well!!! Got some MM somewhere. I think they are just so cute.... wish I still had Babies to use on the LO's. Thanks AM for the great share:)
well I have already said it Anne-Marie OMG and I will definitely jacking these as well and having a go at the digi
Beautiful LOs Anne-Marie!!!
Thanks so much for sharing them:)
such gorgeous layouts!!..especially love the first one :)..have the pine cone ink and use it more than any other..now to get the red glimmer mist!
Thanks for sharing!
WOW! what awesome layouts,& such very cute photos of your babies, & what a lot of work you have done. I need to dig out my baby photos of the grandkids and get scrapping some of these myself.
Marion
Thannks great blog
Post a Comment