
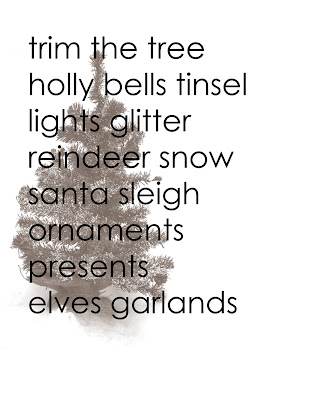
 Print the wordart onto the back of the Christmas Tree paper (used in this Kit) through your standard printer at home. If you are not planning on using the Hybrid element, then simply leave your background blank, or even hand stamp some letters onto the background.
 Step 1:
If you are printing out the Hybrid worksheet, cut the Xmas tree paper to 8.5 x 11inches to fit through your printer (this is standard A4 size).
Step 2:
Flip it over and feed it into your printer so that it prints on the more "plain" side.
Step 3:
Once printed, leave it to dry for a few moments so that it doesn't smudge.
Step 4:
While you are waiting, trim around the outside of your Glitter musical note paper, as well as trim around the outer edges of the flocked poinsettia paper design (vertically). The music paper will be mounted across the right middle of the LO, and the poinsettia paper down the right hand side overlapping everything else (see below for pic).
Steps 5.1 and 5.2:
Use a dinner plate or large circle template to trace a circle onto the Argyle paper and cut out. Adhere with the Argyle paper facing OUT onto the back of the Die Cut scalloped cardstock.
Step 6:
Use a stencil knife to cut a small cross into the middle of the Die Cut cardstock.
Step 7:
Pull open the now cut edges from the middle of the Die Cut cardstock - be rough, as we will need to be rolling and folding these papers over. Stick some adhesive on the TOP of each torn corner, then fold these corners over and under and stick them onto the base.
 Step 8:
Trim some small strips from your Christmas words paper and adhere them to the left edge and bottom edge of your LO. Then adhere your whole torn circle WITH the printed wordart at the back (see pic).
Now it is time to place your photo (I have mounted mine onto a piece of cardstock so that it can remain up off the surface). The photo gets adhered to the base of the LO overlapping the right edges of the torn circle.
 Step 9:
The final step is to trim some of the flocked poinsettia flowers from the paper and use these as embellishments. Also add your title, following the curve of the Die Cut cardstock. You can also use your gems as flourishes across the bottom of your page - why not alternate your colours for a really traditional look?
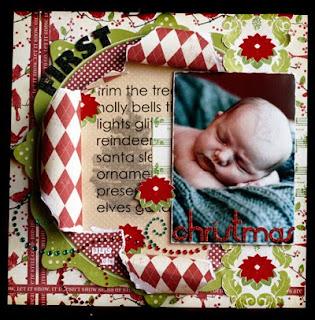
Here is a photo of the LO as a final product:
 I know it looks (and probably sounds!) like a lot of fiddling, but believe me when I say it's worth the effort :)
8 comments:
oh another different project to try thanks so much Sarah
What a fantastic page, love the whole design :)
Love the exploding effect - definately will be giving this one a go...
I love the exploding effect....absolutley an awesome layout. I am going to give this one a go.
Marion
Fantastic layout. Love everything. Can't wait to try this one.
oh sares what a DEVINE photo!!! Gorgeous LO too... very effective. TFS
STUNNING!!!!! i will be having a go at this LO for sure
Awesome technique there Sarah - thanks for sharing!!!!!!
Post a Comment