POST-IT NOTE HOLDER
~/~ A quick and easy gift for your child's teacher or your work colleagues. ~/~
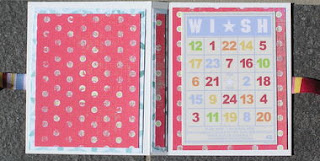
 The interior of the cover.
The interior complete with Post-It notes, pencil and loop.
SUPPLIES NEEDED:
1 - 4" x 7" heavy weight cardstock
3 - 3.75" x 3" contrasting cardstock or heavy weight pattern paper
3 - 2.75" x 3.5"
1 - 0.25" x 1" cardstock
1 - small pencil (like thee ones used for Keno!)
2 - 5" pieces of ribbon
1 - pack square Post-It notes
Embellishments of your choice for the cover
INSTRUCTIONS:
1) Place the 4" x 7" piece of cardstock horizontally on your work space (i.e. running longwise from left to right). Score cardstock 3.25" from each end.
2) Fold the cardstock along the score lines so as to form a 0.5" spine in the centre
3) Mat each of the 2.75" x 3.5" pattern paper pieces by adhering them to the 3" x 3.75" cardstock/pattern paper.
4) Adhere one of the matted pieces to the outside cover of the holder.
5) Adhere the two pieces of ribbon to the inside of the holder; each approx. 0.25" in from the edge and in the centre. One piece will be on the reverse of the front and the other will be on the inside of the back portion of the holder.
6) Adhere the remaining two pieces of matted paper to the inside of the holder so that the ends of the ribbons are covered.
7) Adhere the Post-It notes towards the top of the right side, inside the holder.
8) Use the 0.25" x 1" piece of cardstock and wrap it around the little pencil to make a loop. Now glue this loop immediately below the Post-It notes so that the pencil will run horizonatlly across the bottom of the holder.
9) Embellish the front cover.
All the products used in this sample have been generously provided by Michelle, the devine diva! I have used My Mind's Eye pattern paper; the prints are gorgeous and also it's thick enough to score and makes for a very sturdy holder.
The front cover features a delightful little Jenny Bowlin greeting card too. Catches the eye and is the perfect finishing touch to the gift.
Thanks for joining the Divas Christmas Extravaganza. I'm so looking forward to seeing your creations and your unique interpretations of this project. Hope you have fun with this!
Amanda


7 comments:
fantastic idea Amanda. Thanks heaps
Great project love it :)
Lovely gift idea - might even make one for me for beside the phone.
Love this idea myself, think i might make myself one of these as well.
Marion
What a great idea Amanda. Love your sample.
This is such a cute little project - thanks for sharing it Amanda!!!!!
This looks fantastic... what a clever and practical (not to mention cute) gift idea. TFS
Post a Comment